Overview
This article is a follow up of the “Setup Mesos on a single node” article.
By default I have chosen to use Docker to run images and containers for all the tasks. This is a de facto choice, so no scenario will be shown about Docker usage: it will be used. I will not focus on the number of master and slaves advices, as well as the number of zookeepers. A good starting point to study this topic could be here.
In any case logically the configuration is the following:
- 1 machine with installed:
- Mesos Master
- Mesosphere
- Zookeeper
- Docker engine
- Chronos (optional)
- 1 machine with installed:
- Mesos Slave
- Docker engine
Use Cases
Use Case 1: Building a Docker Image as build result
Currently we have no docker in production machines. So building and publishing as a result of a build the docker image to be deployed in the environments is not a useful use case for our scenario.
Use Case 2: Build artifacts as usual but simplify build environment
This use cases allows to simplify build environments, allowing to have only needed library/tools dependencies and no overlapping version.
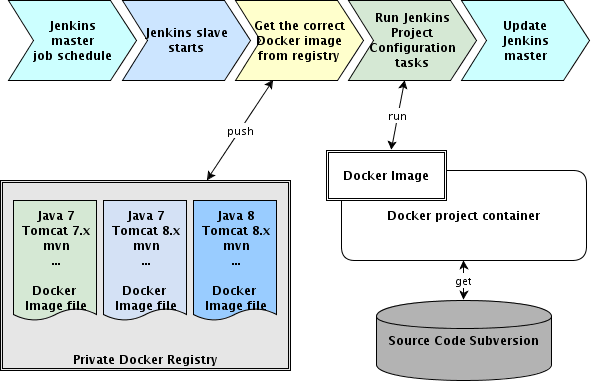
I am supposing that every project has it is own base image which contain all the specific dependencies and settings which allows to build itself from source code provided by direct access to sub version. The build can be done as usual using maven or gradle.
Possible base images:
- Java7, Maven 3.1.1
- Java 8, Maven 3.2.2
- Java7, Android 19, Gradle
- Java7, Android 20, Gradle
- …
Scenario1: Using directly Jenkins framework
The first scenario evaluated is to use directly Jenkins as Mesos Framework: In fact Jenkins can be extended to became a valid Mesos Framework using the mesos-plugin. In this scenario jenkins is a single point of entry of the system and as well is a single point of failure.
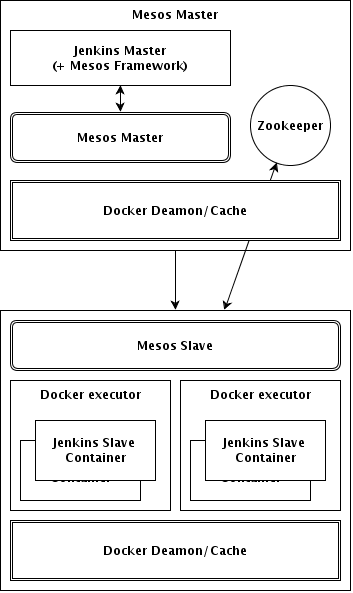
To be precise the docker engine on the master is currently not mandatory. To install Jenkins simply:
sudo apt-get install jenkins
As done before to disable the automatic execution of the jenkins service (installed by the previous command) create and jenkins.override file in the /etc/init folder with manual word inside.
Installing Mesos-Plugin
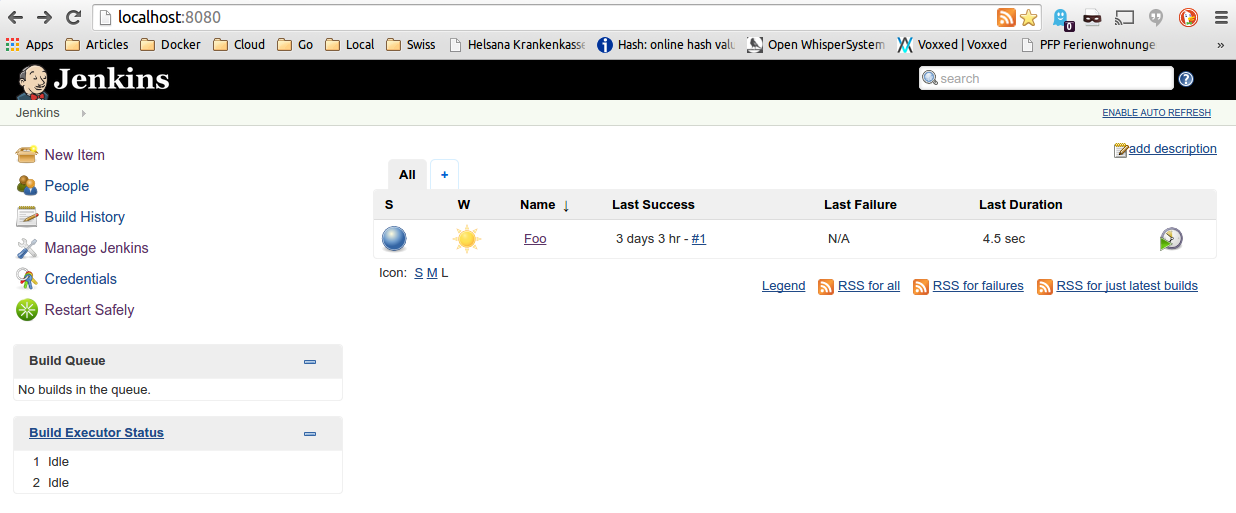
Once Jenkins is running, it will be possible to install the Mesos-plugin framework and configure it, directly from the web ui. Access to http://localhost:8080 to access to Jenkins Home page:
To install the mesos plugin with direct Internet access:
- click on Manage Jenkins
- click on Manage Plugins
- select Available tab
- select Mesos and install it
To install the mesos plugin without Internet access:
- from a machine with Internet access go here and download the mesos.hpi file
- move the previously downloaded file to the Jenkins machine in the /var/lib/jenkins/plugins folder
- restart jenkins
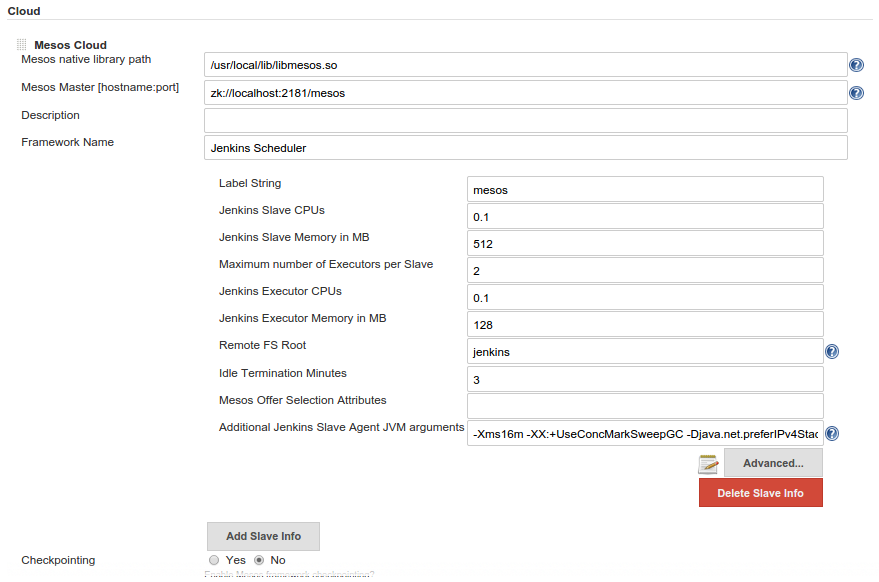
Configuring Mesos-Plugin
- click on Manage Jenkins
- click on Configure System
- add a new Mesos Cloud and configure like following
Scenario 2: Using Marathon framework as intermediary
The second scenario is more reliable because it will use Marathon which is a long duration task runner which has the aim to start the jenkins master and motior it as well.
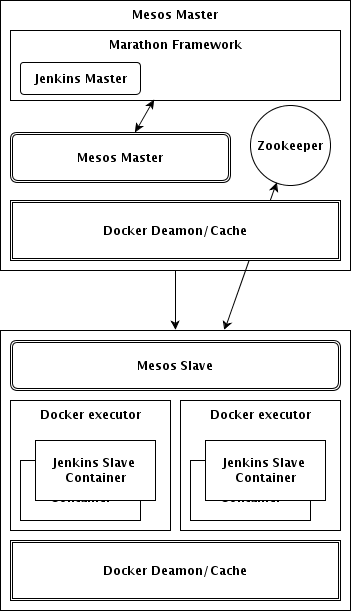
To be precise the docker engine on the master currently is not mandatory.
To install jenkins and run it as Marathon it is a little bit more complicated than scenario 1.
Marathon runs tasks in isolated environment (temporary folders) so the previously shown jenkins configuration must be done before the task is executed otherwise all the changes are lost once the task will be terminated or will deleted.
In order to achieve this goal one of the possible approaches is to prepare a folder containing the jenkins war to be executed witl also the config.xml file which jenkins uses to store all the intalled plugins and other configuration which can be done using the web ui.
Preparing the jenkins war and plugins folder
Steps to be done to let mesos plugin working. All other plugins and jenkins configuration must be done in the same way if we don’t want to loose changes after task restart.
- Create a jenkins-ci folder
- Download latest jenkins.war and copy it into jenkins-ci folder previously created
- Create a plugins folder into jenkins-ci folder
- Download mesos.hpi and saferestart.hpi plugins from jenkin plugin web site and copy them into plugins folder previously created
Preparing the config.xml
Jenkins mesos plugin must be configured:
- Create or copy an existing config.xml file into jenkins-ci folder
-
Configure the mesos plugin:
 ....
 		<clouds>
 	<org.jenkinsci.plugins.mesos.MesosCloud plugin="mesos@0.5.0">
			<name>MesosCloud</name>
			<nativeLibraryPath>/usr/local/lib/libmesos.so</nativeLibraryPath>
			<master>zk://localhost:2181/mesos</master>
			<description>CI-Cluster</description>
			<frameworkName>Jenkins.Scheduler</frameworkName>
			<checkpoint>false</checkpoint>
			<onDemandRegistration>false</onDemandRegistration>
			<slaveInfos>
  			<org.jenkinsci.plugins.mesos.MesosSlaveInfo>
    				<slaveCpus>0.2</slaveCpus>
    				<slaveMem>512</slaveMem>
    				<executorCpus>0.2</executorCpus>
    				<maxExecutors>2</maxExecutors>
    				<executorMem>128</executorMem>
    				<remoteFSRoot>jenkins</remoteFSRoot>
    				<idleTerminationMinutes>3</idleTerminationMinutes>
    				<jvmArgs>-Xms16m -XX:+UseConcMarkSweepGC -Djava.net.preferIPv4Stack=true</jvmArgs>
    				<labelString>mesos</labelString>
  			</org.jenkinsci.plugins.mesos.MesosSlaveInfo>
			</slaveInfos>
  		</org.jenkinsci.plugins.mesos.MesosCloud>
	</clouds>
The important parts to notice are:
- master: the zookeeper master/masters url
- slave resources section: will hold the amout of resources which will be allocated for every slave
- labelString: is mandatory and tells to jenkins master that each job with same associated label must belong to this slave.
Run the task
I selected to use github account to pull the jenkins.war file and its own config files.
From Marathon ui, add a new task and fill command area with something like:
git clone https://github.com/your-user/your-jenkins.git && cd your-jenkins;
 	export JENKINS_HOME=$(pwd);
 	java -jar jenkins.war --webroot=war --httpPort=$PORT0 --ajp13Port=-1 --httpListenAddress=0.0.0.0 --ajp13ListenAddress=127.0.0.1 --preferredClassLoader=java.net.URLClassLoader --logfile=../jenkins.log
See below:
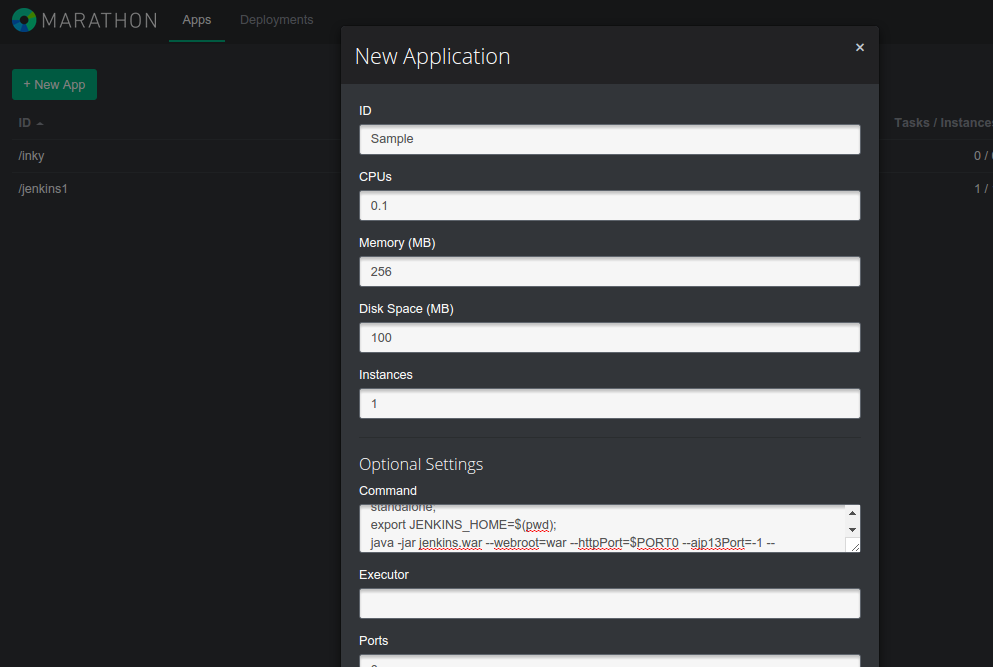
And click create. The Jenkins-Master now is created as a Marathon application.
Building using Docker images
The most interesting thing is to try to build using dockerized images. Advantages are related to isolation of environments, avoid dependencies hell and so on. I am not going to explain what Docker is and why it is useful here. This section is related to using docker in jenkins and build in a mesos environment.
Let’s start.
The mesos plugin in jenkins allows me to define a mesos cloud which point to my mesos-master using zookeeper url configuration information. In each mesos cloud is it possible to define different slaves and for each slave is it possible to define several parameters, but let’s focus on two of them:
<slaveInfos>
	<org.jenkinsci.plugins.mesos.MesosSlaveInfo>
   		<slaveCpus>0.2</slaveCpus>
   		<slaveMem>512</slaveMem>
   		<executorCpus>0.2</executorCpus>
   		<maxExecutors>2</maxExecutors>
   		<executorMem>128</executorMem>
   		<remoteFSRoot>jenkins</remoteFSRoot>
   		<idleTerminationMinutes>3</idleTerminationMinutes>
   		<jvmArgs>-Xms16m -XX:+UseConcMarkSweepGC -Djava.net.preferIPv4Stack=true</jvmArgs>
   		<containerInfo>
     		<type>DOCKER</type>
     		<dockerImage>gi4nks/java7</dockerImage>
   		</containerInfo>
   		<labelString>mesos</labelString>
 	</org.jenkinsci.plugins.mesos.MesosSlaveInfo>
 </slaveInfos>
- labelString: contains the label which will be associated to each job configuration and will teach to jenkins master to assign this slave on the execution of a specified job
- containerInfo: will teach to jenkins slave to run the job inside the specified docker image.
This configuration needs some mandatory tools and stuffs:
- Docker Engine must be installed on each mesos-slave
- Jenkins-Slave must be installed on each Docker Image which would be used as starting point for building (a good starting image to build own images could be this one: https://registry.hub.docker.com/u/evarga/jenkins-slave/)
Once Docker Images have been built and configured correctly, is it possible to create a new Jenkins Job and run the build.
Remember to define correctly the label to associate to each job.
Enjoy!
